Frequently someone asks me for an advice which antivirus use, how to protect from the “viruses” and similar things. For this reason, I have decided to say some words about this on my blog.
A good antivirus software it is not all you need, above all, you need to control yourself. You have to avoid browsing on some not good internet pages, you have to avoid to install all software that you think “maybe will be useful”, in other words, work with computer responsibly and think of what can happen in advice.
Finally, think about all devices, that you have. It is not good to say “it is only tablet or phone”. This type of thinking has as a result a 614% grow of malware on Android devices in a year!
Also for the computer think what is going on. Now there is a Trojan malware where you have to answer on a survey!
And on “The Question” which antivirus software is good, I always avoid the response. The reason is simple: everyone of us has personal preferences and thinking. As a result of this, it is impossible to give the perfectly correct answer, but you can find Antivirus software tests here. This can give you a good view to find the right software..
Category: Management
How to enable the DaRT functionality in the MDT 2012
In the MDT version 2012 is possible to integrate the DaRT in boot images, created in MDT. This functionality is native, but some additional steps must be done.
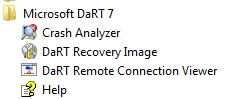
For the first thing you have to download the Microsoft Desktop Optimization Pack 2011 R2 from Microsoft TechNet and install the DaRT on your computer. Of course you need a x32 and x64 computer if you want to use both versions, 32 and 64bit version. When you will install the DaRT, you will install also the DaRT Remote Connection Viewer and you can use it for later connections to other computers.
The second step is to copy the file Tools.cab from the folder C:Program FilesMicrosoft DaRT 7v7 to the server folder Deploytoolsx64 or (and) x86, where Deploy stands for Deployment Share path. I’ve attached both tools.cab files if you don’t want to install the DaRT on your computer, or you don’t have 32 and 64 bit versions of OS. You just rename both tools32.cab and tools64.cab to tools.cab, after copying them on the server.
At this point most is done. You have to restart the MDT console if it is open,then you must go to deployment share properties,and check the DaRT integration on WinPE tab.
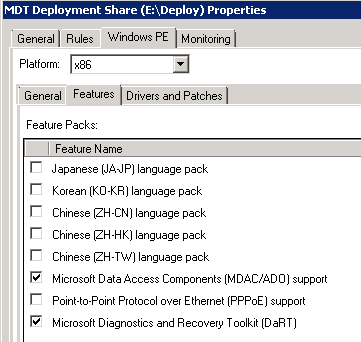
Be sure, that you enable the checkbox on both versions.
The last thing to do is rebuild the boot images and import them into WDS and other boot devices.
Upgrade from MDT 2010 to MDT 2012
Now is available a new version of MDT and of course there are new functionalities and new options. For this reason it is normal to upgrade it. There is no support to direct upgrade, but is very easy to upgrade it.
For the first thing, you have to uninstall the old version. You can uninstall it with default options, but be careful with deployment shares. You will need them in the future.
The second thing is a normal installation of MDT 2012. Then you have to start it. There you will see (or you will be able to import) all deployment shares, but they are not yet functional. They need to be upgraded.
Right click to any share and select the option upgrade. The share will be now present normally to the MDT and you will probably think that everything is OK, but if you try to use it, you will have problems. This is because you are still using the old boot image and this is the last step you have to do. You must rebuild all boot images and change them in WDS and other boot devices. I suggest, that in this step you select “Completely regenerate image”. You must have in mind that the version of MDT is changed and there are possible a lot of differences in the boot images.
That’s all. Make it a good use..
Enabling NTP service on Windows Server 2008 / 2008R2
Setting time server on Windows Server 2008 or 2008 R2 appears to be still difficult for some administrators. For this reason I have decided to write on my blog how to set it from command prompt. It exists also a version to modify the same settings from registry, but I prefer other ways.
If you want to set time services, the command prompt must be opened as administrator. There you must write some commands:
- w32tm /config /manualpeerlist:ntp1.arnes.si /syncfromflags:MANUAL /reliable:yes – this command will configure the NTP server to ntp1.arnes.si (of course you can use other servers) and set the synchronization. Switch syncfromflags has two options MANUAL if you synchronize from the manual peer list (in our case), or DOMHIER if you want to synchronize from the DC (this of course exclude manualpeerlist switch). Switch Reliable sets this computer as a reliable time service.
- w32tm /config /update – of course you must update the configuration and this is done in this step.
- net stop w32time and net start w32time – you must restart the time service for applying the use of the desired configuration.
- w32tm /resync /rediscover – this step is an optional, but is very good for testing. The only thing we do here is forcing the synchronization. This is very nice to test if everything is OK.
This are commands to set NTP time server, but don’t forget that the NTP server must be reachable from your computer. There are a lot of errors in this step,so put a look to firewalls if the port UDP 123 is open. The list of NTP servers is here. You will found one that is OK for you.
One of the SMB150 winners!
 |
Thanks to everyone who helped me to be one of the SMB 150 Influencers for 2012, the event organized by SMB Nation and SMB Technology Network. I am very excited about this. On SMB 150 site you can read “The SMB 150 honors individuals who have made a significant impact on the worldwide small and medium business (SMB) channel” and I am very happy to be part of this story and to know, that I am doing a good job. Thanks again to my supporters! |
