Migrating Enterprise CA to new server (Part 1)

This will be a step by step process to migrate Active Directory Certificate Services from one server to another in same domain. It is a case when you upgrade or change your server where CA is installed.
You have to know some basic things before you begin to migrate a CA server:

  • It is recommended that the new server has the same name as old one – this because we have CRL and other paths in certificates. If this name is not accessible, we can’t control the validity of the certificate.
  • This is not a migration from one server to another; we have to export all settings and backups from the old server, demount it and after this install the new one with the same name. Errors and mistakes are not allowed.
  • Do the migration slowly, take your time, document everything. You will need all the documentation during the migration and supporting period.
  • In this guide, you will find steps to migrate one server. If you have a more complicated environment with more servers and subordinary CAs, then you need plans for migration of the entire migration before you start the migration.

Source server
First take full backup of the entire server. This step is non mandatory, but you may need it if something goes wrong.

After this check and write down the server name, IP address (if is static), paths where CA database and CRL are located. You will need this data to restore the same configuration on the new server.

Now, the crucial step is to make a backup of all certificates, certificate templates, settings, databases, root CA and registry settings. Unfortunately, CA backup does not care about all settings – it will backup only the CA database. Steps that are required to be able to transfer the entire configuration are:

  • Check all the roles that are installed (CA, CA Web enrolment…) because you will need to install the same roles on the destination server.
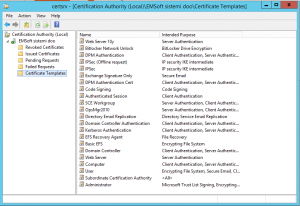
  • In MMC (mmc.exe) open the Certificate Authority snap in and take a screenshot or write down the names of certificate templates you are using. When you will install the new server, you will have to enable same templates. You can export all certificate template names also with command certutil.exe –catemplates > D:\Backup\catemplates.txt from administrative Command prompt. This step is required only if you are using enterprise CA.

  • Now, that we have the CA opened in MMC, we can also use it to backup CA database. To do this right click on CA server name, go to All tasks and select Back up CA. Follow the wizard and be careful that you select Private key and CA certificate and Certificate database and certificate database log check boxes. Only in this way you will backup all data that we need.
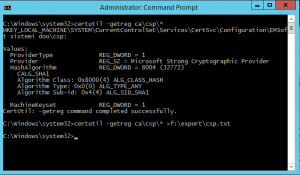
  • Record your CAs CSP and signature algorithm. This can be done by executing command certutil.exe –getreg ca\csp\* > d:\Backup\csp.txt from administrative Command prompt. There will be nothing to do later if you are using default algorithms, but is always better to check.

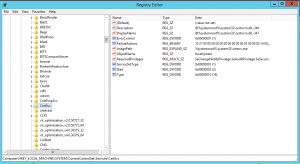
  • Export the registry keys: on destination server you will need to have the same settings as you had on source, so you need to export registry separately because this is not a part of CA backup procedure. Open Regedit.exe and navigate to HKLM\SYSTEM\CurrentControlSet\Services\CertSvc\Configuration. Right click to key and save it to file.

  • If you are using custum policy, you should include it into backup. This means that you have to copy the file CAPolicy.inf that is located in C:\Windows (System root folder).
  • Review all steps to check if they are done correctly!
  • Using server manager remove CA roles from the server and restart the server.
  • Remove server from domain, restart it and at the end turn it off. If you have other roles on the same server, you also have to move them on other servers. From this point your old server is down – you don’t need it anymore.

Have your forgotten your Local Administrator password?

Well, if the computer is yours and you have physical access to it, than you can solve it.
This procedure will work with Windows 8.x and newer and Windows server 2012 and newer. It is not a real hacking technology, but we will use a hole of the operating system.
All we need in this case is to open a shell with enough high privileges before we are asked for the password. Impossible? Not really.
We will do it in a simple way:

  • Insert installation media to your computer and start it from installation media
  • In installation process select Repair your computer

  • In Choose your option select Troubleshoot and then Command prompt

  • Find the partition where Windows are installed (default is C:) and change directory to Windows\System32 (cd \\Windows\\System32)
  • For server systems you have to rename file “UserInit.exe” to something else, using command Ren UserInit.exe Userinit.Old and replace the missing file with cmd by copying a file with command copy cmd.exe userinit.exe
  • For windows systems you have to rename the file “Utilman.exe” to something else, using the command Ren Utilman.exe Utilman.Old and replace the missing file with cmd by copying a file with command copy cmd.exe Utilman.exe

  • Restart the computer to boot into normal operating system (where you forgot the password)
  • Click on Easy of Access icon and a Command prompt window will open. To clarify, this Command shell is opened as system, so you can do a lot of things here.

  • If Administrator account is disabled (Windows 8.x or 10), first you need to enable it with command Net user Administrator /enable:yes
  • Reset password of Administrator account with command Net user Administrator MyPassword, where MyPassword is your new password

  • Close command prompt and login to your System.

Do not use this procedure for hacking. This article is meant for recovering your passwords and passwords for your clients and will not recover domain passwords.

Configuring Antivirus on Server

As you know, Windows Server 2016 will have Defender installed by default. Here could be a problem as we have to do some exclusions and we don’t look how the Defender is configured by default.
Microsoft published one great post where you can see what are exceptions in Defender for each server role and of course this is a good start also to configure your own antivirus software. Be careful, because it is true that antivirus software can protect you, but a misconfigured one can make also damages.

Export and import DHCP settings with netsh

Sometimes you will have to transfer DHCP settings via netsh command. This could be useful for a couple of reasons and it is fine to know how to approach it. Anyway, this is the quickest way to do a DHCP migration.
First you have to login to source server (it could be also a failover clustered DHCP service) and open CMD as Administrator. Then you have to enter in netsh mode with typing:
netsh
Now you have to select server with typing:
dns server \\servername
Where servername is the name of the old DHCP server or clustered service name. This will connect you to DHCP server and you are ready to export settings with this command:
export filename all        to export the entire configuration or
export filename 192.168.222.0    to export only a scope configuration (in my case 192.168.222.0)
Of course, you have to replace the filename with full path and name of the file where you want to save exported data. This file now must be transferred to target – new server and we are ready to import the configuration. Of course, priory you import the configuration, the new server has to be authorized in AD. To begin an import procedure, we have to do the same steps as on the old server; open command prompt, enter into netsh mode and select DHCP server. After this, we have just a step to import settings with this command:
Import filename all        to import all settings or
Import filename 192.168.222.0    to import just a scope
That’s all. Just be sure to double-check if the import did its job, disable and unautorize the old server (you can do it also with netsh: netsh dhcp delete server ServerIP). Of course, don’t forget to uninstall the service on the old computer.
You have finished. Good work!

Empty screen when you login to DC

Recently I took custody over an IT system and unfortunately, the previous admin was not really an expert – I expected some problems with implementation of best practice.
Anyway, I found this problem: after deleting some stupid settings in Default domain policy, I was not able to login to domain controllers. The login (it was the same if I tried to login locally or thru RDS) showed me only clean blue screen, without any icon, without start menu and other content. The first approach was trying with CRTL + ALT + DEL and launch Task manager where I wanted to start Explorer. Well, also Task manager didn’t work.
When I exanimated what I did previously (what could be the cause of this error) I found that I removed some settings form default domain policy (in my case it was the setting that allowed Domain admins to act as a part of OS – I didn’t even try to restore it ). Here, I suspected that it could be a security problem and I run two commands remotely using PSexec:
Net localgroup Users Interactive /add
Net localgroup Users “Authenticated Users” /add
Unexpectedly this solved my problem also if local groups are disabled on DC.
Hope that it will help someone.