As a lot of us probably heard in the last days, Microsoft declared that Windows SBS server is out. They told us this is because we are entering in new era of Cloud computing and this is definitely the way where companies in SMB segment will go.
I don’t completely agree with this statement, but this is the way where we go… Maybe in the near future the Cloud will be really the best solution, but now there are still a lot of small companies who don’t have a good internet connection or just don’t want to go in the Cloud.
We have to remind that it was a day when SBS appears on market and now it is the day when it disappears. The only thing that remains from this project is Windows Server 2012 Essentials. Let’s take a short look on it:
This is a very similar project to Windows SBS 2011 Essentials and it has more or less the same functions. It is designed for very small businesses with a maximum of 25 users (and also a maximum of 50 devices). It has a very easy to manage SBS console and a similar remote web access as the previous version. Of course the synchronization with Office 365 is natively supported, but the new thing is the support to on premise Exchange on the second server. In this case, of course, you have to buy Windows Server 2012 Standard and Exchange Server + CALs. A new feature in this version is also Online Backup, which is used to back up your system in the Microsoft Cloud. The good news is,that 100GB of space are included with any installation of Windows Server 2012 Essentials for free (in Beta version,I’m not sure about the amount of free storage in the release version).
It will be available also the “transition pack”, which is the way to “upgrade” Essentials version to Standard. It removes all limits, except the limit for the number of backups for the client computers (the maximum is 75 PCs). After the transition there will still remain some functions like RWA and SBS Console (but I am not sure if Console will be useful with a large number of users). At transition I’m also worried how we will manage or convert the users. In Essentials version they have permissions in file system and in AD established on principle user by user. This is practically impossible to manage in large environments like the new one will be.
Anyway, like it or not, I invite you to download and try Essentials version from here, to be prepared when it will come on the market..
Tag: Windows Server
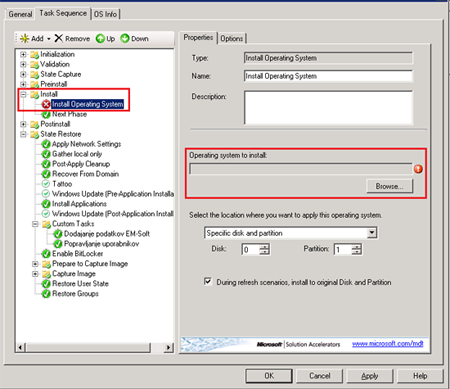
Replacing OS image in MDT 2012
Days ago I had a problem on one of MDT”s. There were installed OS images for some Windows 7 systems without SP1. Because I use the ImagePatcher PowerShell script to offline update all images, and there is no way to install SP1 with offline updating, I tried to delete the images and update new ones directly from DVD.
In that moment I had a problem with task sequences, because they lose OS images to install.
This problem can be solved very easy, with few clicks. You must open the desire task sequence and go to the tab Task sequence. You can find there the task “Install operating system”. In this task you have just to browse the right system you want to install.
Upgrade from MDT 2010 to MDT 2012
Now is available a new version of MDT and of course there are new functionalities and new options. For this reason it is normal to upgrade it. There is no support to direct upgrade, but is very easy to upgrade it.
For the first thing, you have to uninstall the old version. You can uninstall it with default options, but be careful with deployment shares. You will need them in the future.
The second thing is a normal installation of MDT 2012. Then you have to start it. There you will see (or you will be able to import) all deployment shares, but they are not yet functional. They need to be upgraded.
Right click to any share and select the option upgrade. The share will be now present normally to the MDT and you will probably think that everything is OK, but if you try to use it, you will have problems. This is because you are still using the old boot image and this is the last step you have to do. You must rebuild all boot images and change them in WDS and other boot devices. I suggest, that in this step you select “Completely regenerate image”. You must have in mind that the version of MDT is changed and there are possible a lot of differences in the boot images.
That’s all. Make it a good use..
Windows server 2012 RC is available to download
From May 31th is available for public Windows Server 2012 RC. You can download the latest version from TechNet and test it. It is free and it offers a lot of opportunities to test new features and functions. This is really a big step in technology, so you must test it as soon as possible. Don’t wait for the last minute!
As always you can download an ISO image for setup or a VHD image. If you prefer prepared and guided labs, they are also available for testing and learn new functions. They are free accessible here..
Enabling NTP service on Windows Server 2008 / 2008R2
Setting time server on Windows Server 2008 or 2008 R2 appears to be still difficult for some administrators. For this reason I have decided to write on my blog how to set it from command prompt. It exists also a version to modify the same settings from registry, but I prefer other ways.
If you want to set time services, the command prompt must be opened as administrator. There you must write some commands:
- w32tm /config /manualpeerlist:ntp1.arnes.si /syncfromflags:MANUAL /reliable:yes – this command will configure the NTP server to ntp1.arnes.si (of course you can use other servers) and set the synchronization. Switch syncfromflags has two options MANUAL if you synchronize from the manual peer list (in our case), or DOMHIER if you want to synchronize from the DC (this of course exclude manualpeerlist switch). Switch Reliable sets this computer as a reliable time service.
- w32tm /config /update – of course you must update the configuration and this is done in this step.
- net stop w32time and net start w32time – you must restart the time service for applying the use of the desired configuration.
- w32tm /resync /rediscover – this step is an optional, but is very good for testing. The only thing we do here is forcing the synchronization. This is very nice to test if everything is OK.
This are commands to set NTP time server, but don’t forget that the NTP server must be reachable from your computer. There are a lot of errors in this step,so put a look to firewalls if the port UDP 123 is open. The list of NTP servers is here. You will found one that is OK for you.
