Add Groups and Users to AD with PowerShell

When I have to manage a bigger environment, with many groups and users, I always think to PowerShell. Of course, the first step to work with PowerShell is that you have all users or groups listed in a CSV (or similar) file. The first problem for many administrators is the structure of the CSV and data needed by AD. I want to talk about this, because CSV stands for comma separated value, what means that all fields are separated by comma. Nothing strange or new, but as we know also AD structure is using commas to delaminate OU’s, domains etc. Because of this, please be careful when you create your CSV file. I prefer to create CSV file with semicolon as delimiter and then all the things are going right.
The second step that I use is to create at maximum three CSV files; one containing new AD groups, the second containing Group nesting (groups that are members of groups) and the last one containing users (Users and groups that have to be members). If you receive that data form other sources, be careful and first just test if all data are correct (if users really exist, if there is no typing error) and after this step begin with the implementation. This could be done with the same script, just delete the lines that contains write actions and export results in a test file for the future control.
Creating a CSV files: For me, the best program to create CSV files is Microsoft Excel. Everyone knows the program in the way that can type names and some data in (not all, you will have to type some attributes yourself) I always use the same structure of CSV and for this reason I never have problem with the script. Fundamentally is first line, where you have to define columns. So there are my columns:

For Groups CSV (New groups to be created):

  • Name – The name of the group
  • DisplayName – Display name of the group
  • Description – Group description (non mandatory)
  • OU – OU, where group will be created (Strucure OU=MyOU,DC=Domain,DC=com)
  • GroupType – Security or Distribution
  • Mail – E-Mail address of the group, if it will exist

For GroupMember CSV (Defines membership of Groups in groups – nesting):

  • Group – Name of the group which will have a group inside
  • Member – Name of the group which will be added as a member

For Members CSV (Define users who will be added to groups):

  • GroupName – Name of the group where users will be added
  • Member – Display Name of the user

This is all that you need. The next step is to test that Names of all users and all names are typed correctly. After you find that all data are OK, just run the scripts. I always use this order: first, I create groups, than I add groups to groups and finally I add Users into groups. This gives me certainty that I always have object that I need created previously.

The script can be downladed here:
GroupsAD.zip.

LepideAuditor for File Server

LepideAuditor for File Server is a nice and powerful tool for auditing file servers. It has many good characteristics and it is one of my preferred auditing tools.
When I installed it for the first time, it seemed to me that I did something wrong; I was not able to realize that you can install and configure auditing software so easy. However, it was true. Installing and configuring this software is very easy and Lepide did a great job here. The next thing that surprised me was the fact that I had two completely separate modules – one for configuration and monitoring and the other for reporting. This approach gives me the opportunity to give to someone of the non-administrative stuff (company manager) the opportunity to control who is accessing the files and what is he / she doing in the system, without the ability to change audit parameters and with no need of any knowledge of configuration.

Lepide1
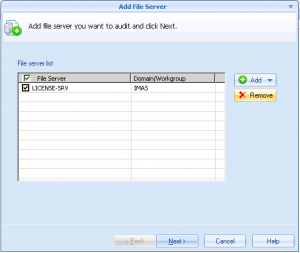
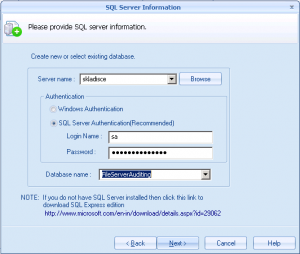
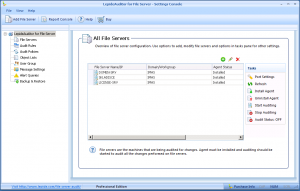
After installing the software from the install package, it is time to configure the software and this step is easy to do. For the first thing, you have to add the file servers which you want to monitor. This is done with a wizard in few steps and here you have to specify servers (you can browse from AD), select the SQL server and database, install the agent and add servers to Audit server group. Here I saw an opportunity for small companies, where administrators many times have problems with budget and buying a SQL server is not an option – Lepide File Server Auditor can work with SQL Express! This is not a limitation if you have a bigger company as you can choice a dedicated SQL server and in this way store more data.

Lepide2 Lepide3
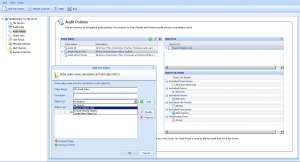
There is also a very simple and effective way to create Audit policy and this enable administrators with not so many knowledge to use preconfigured policies or quickly create a new one. Another great functionality is the object lists, which allows you to exclude some file types (like TMP) from logging or include just file types that you need to monitor. As it seems that is not so important, you will quickly find that is very useful to have smaller log databases. You can also set up logging for some users only or just for a group of users, but here I prefer always to log all users. You never know what will happen!
In addition, don’t forget to setup alerts! Alerting is done very good, you can choose all types of alerts and how you want to deliver them.
Lepide4
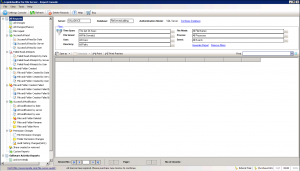
The reporting console is very nice organized, with many possibilities how to show and filter our data. It is nice structured and logically done, so anyone can fine his needs. I like a lot the concept of the console, where when you open it, you can immediately determinate some options and review the results. You can simply choose the event you are searching for (read or write file, change permissions, create or delete folder…) and apply on them additional filters true success or failure. It is simple!
Of course, you always need some special filters, where you have to search events and those are present on the top. They are very accurate and choosing the right combination will give you any expected result with only data that you search. It is one of my favorite reporting console, because you are able to find any result you need quickly and logically. Don’t forget that this console is many times used by IT and non-IT people. It is done very nice also for management or non-IT people; they will love it.
Lepide5
Conclusion:
Lepide did a great job with this product. It is very easy to manage and easy to install and configure. I can say that is reliable, so the results you will get are useful for all needs, printed reports are nice done and it is simple to explain the content to anyone. Alerting is very well done and I like the SMS and mail options, but here you have to be careful as you can quickly receive a lot of alerts on mismatched configuration.
I can recommend this software to everyone. It is a good solution for small and bigger companies, you can also think on integrating other excellent Lepide products together and in this way, you will have a very nice monitoring environment.

You can download LepideAuditor for File Server trial version from http://www.lepide.com/file-server-audit/download.html. .

Create Virtual network in Azure

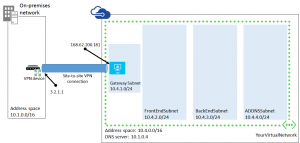
I decided to publish few articles where I will document how to create a hybrid network between your local network and Azure (using some chip routers) and finaly how to create a VM in Azure as a part of your network. This is the Part 1 of whole proces and here is covered how to create Virtual network in Microsoft Azure.

In this article I will explain the complete step-by-step guideline how to create a network in Azure, site to site VPN from your local network to Azure and finally how to create an Azure VM connected to your local domain.
There are few things that you have to know:

  • local subnet,
  • IP of local router,
  • IP of local DNS server (in your AD domain).

First we need to create virtual network in Azure. This will be a part of our network, but as we will connect to this network via VPN, it must be on a different subnet.
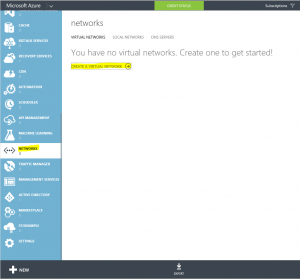
To create a Virtual network, you have to login into an Azure portal, select Networks and then Create a virtual network.

Screen1

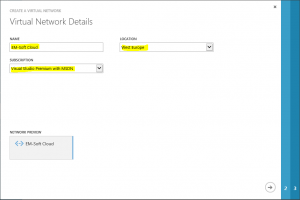
This will launch a wizard for creating network and this are the steps that you have to perform. First just give a name to network and chose a location and subscription. Be careful with choosing a location. Later you will be able to use VPN only to virtual machines, in the same location where the network is.

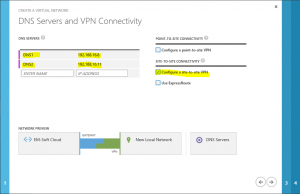
Screen 2

On the second screen you have to enter some data about connectivity. As we said at the beginning, the VPN will be site to site, so you have to select this one. DNS servers will be used to resolve names in this network and as we want to add a virtual machine, which is a part of our Active directory, we should be able to resolve it in our AD. This is the reason why specified DNS servers have to be our local DNS servers from local AD (not public DNS!).

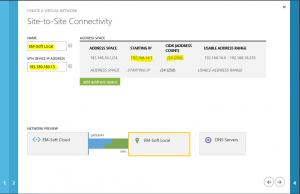
Screen 3Next step is to specify our local network. You have to specify the name of the network.
VPN device IP address is a public address of your router, from which you will establish the connection to Azure.
In address space you have to specify all of your private networks, from which you want to establish connections to Azure.
All of this data are needed by Azure for determination of routes and connectivity.

Screen 4

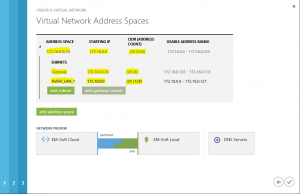
In the last step, you have to define the address space used in Azure. This is a private IP address space and has to be different from your local IP address space.

Screen 5

The rules to define are the same as those you have when you create VPN between two local sites, but there are some more settings:

  • Address space defines the whole address space that you can use as a part of Azure virtual network. Any subnet, which is a part of this network, must be created as a part of this space.
  • Gateway subnet: this subnet is responsible to have connectivity outside of Azure. In this subnet will be located a router, which will act as endpoint of VPN tunnel. Do not use this subnet to create virtual machines in it.
  • Subnet: you have to create at least one subnet. This will be the address space where you will create virtual machines. In many cases will be enough one subnet, but if you have to build a larger deployment, isolations of VM or similar things, maybe you will need more than one.

Screen 6

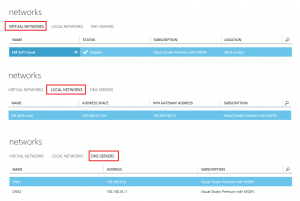
With this steps you created a set of network settings that include Azure virtual network, local network and DNS setting. When you finish this steps, your Azure network is ready to use, but don’t forget to create a gateway. This one is necessary to establish a VPN connection.

Screen 7

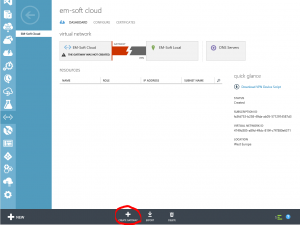
If you want to use this network in a combination with your local network, you have to create a gateway. This is an IP which will act as an end point of VPN Tunnel. For creating the gateway, you have another wizard; it is not complicated, but it could take time (30 minutes or more).

Screen 8

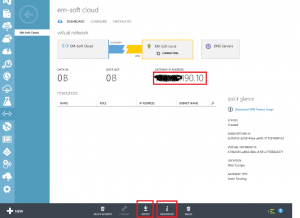
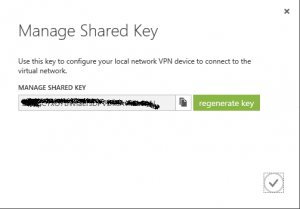
Click on create gateway on the bottom of the page, and use Static routing if you have a static IP address. After the creation of the gateway is complete, you will have an IP address of the gateway. This is the IP address that you will have to write into your local router as the endpoint of VPN. The only thing that is missing now, is a shared key. You can read it by clicking Manage Key button on the bottom of the page. Write down this key, because you will need it later in the router configuration.

If you have a router model (like Cisco…) that is supported by Azure, you can export data to configure it directly from the portal with clicking “Export” button. In all other cases, you will need to estabilish VPN manually – here you will need to press the Manage Key button.

AzN9

 For establishing the connection to Azure network successfully, you will need a preshared key and a gateway IP address (showed at previous and next picture). I recommend, to write them down into some file or on a paper.

AzN10.

Many free tools for administrators

For any administrator, who want to use any kind of free tools to have better access or monitor some functionalities in Windows environments, here we have a list of many free tools. Just look which is usable for you and use it:
https://4sysops.com/best-free-windows-admin-tools/
And please, test it in test environment prior you use it in production. Many times tolls are not exactly the same as you expect..

Forgot ILO Password?

No problem. You can reset it via software from your operating system. It is possible to do it from almost any Windows server system and from Linux (from Linux I didn’t try).
To do this, you have to install HP Lights-Out Online Configuration Utility for the system that you are using. You can download it form HP web page, where the drivers are located.
After you have installed this software, you will need a XML file with this content:

<ribcl VERSION=”2.0″>
 <login USER_LOGIN=”Administrator” PASSWORD=”boguspassword”>
   <user_INFO MODE=”write”>
    <mod_USER USER_LOGIN=”Administrator”>
     <password value=”YourNewPassword”/>
    </mod_USER>
   </user_INFO>
 </login>
 </ribcl>

I know, that the login password (the old one) is not correct, but you don’t need to know it (scary…), it will work.
Save this file into the folder C:\Progam Files\HP\hponcfg and launch the command prompt as Administrator. Navigate to the folder and type:
Hponcfg /f YourFile.xml /l YourLogFile.txt
You will be noticed that script worked correctly. Now you have just to login into ILO with the new password.
Easy to do it. Maybe too easy.

More reading:
Export ILO configuration

ILO Scripting guide.