Essentials Server 2016 TP3 – the first look

The Server 2016 TP3 is now available and of course I tried it to see what is new and which new functionalities can we expect.
The first thing I tried was the installation and it is similar to all previous versions, but there are some new steps that I appreciated.
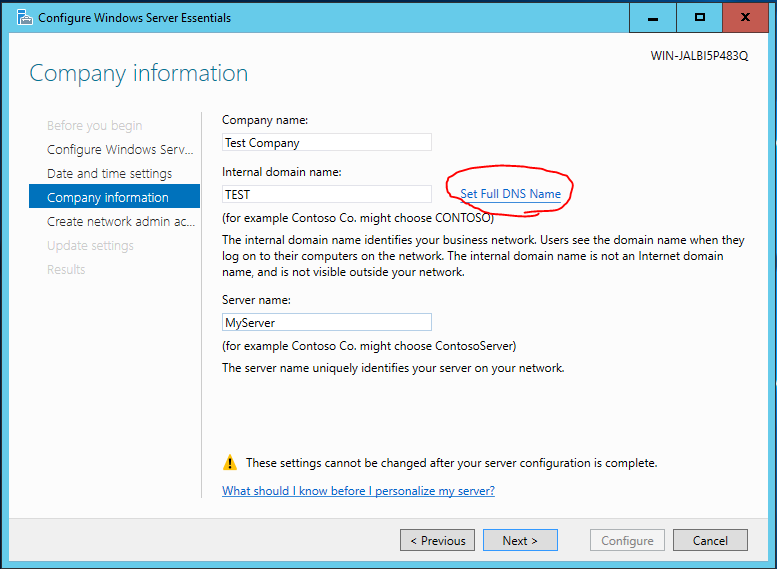
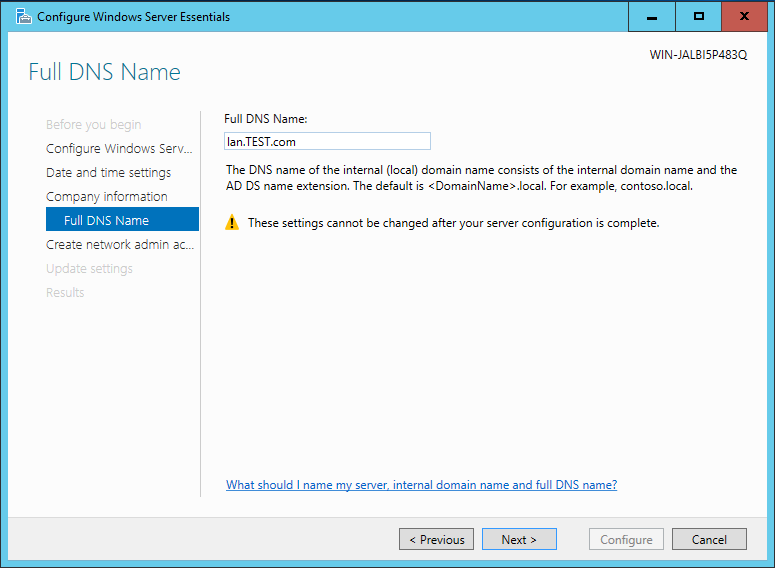
The first change that I like is the domain name. Now you create a non .local domain from GUI, which is very nice and useful. As you should know, in the last years is .local ending DNS name are standardized as “local computer” – that means the pc where you work. From this perspective you can expect some misfunctionalities in long term use and incompatibility with third party certificates. For this reasons it is better to use DNS domains, which you can register. You can change DNS names in the way you see on Pictures 1 and 2.

 Essentials2016-1Essentials2016-2
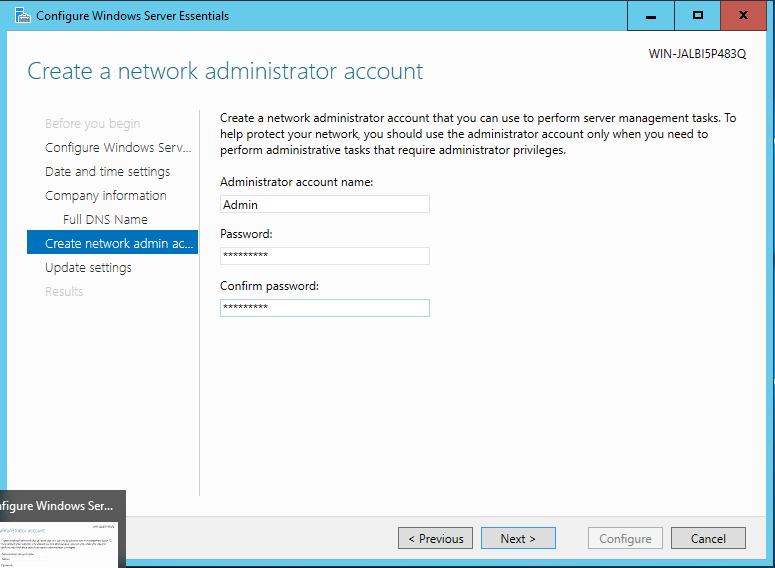
The second difference between normal server and Essentials server is, that Essentials server wants to have different login name for administrator. So as you can see in Picture 3, you have to choose the name and password for administrator. Be careful with the password. As Essentials does not use read DirSync to synchronize passwords between Office365 and local environment, you have to submit the password which is compatible with Office365 policy (8 to 16 characters and without some special characters – this is not the best, because some languages have some special characters). I hope that in future this policy will change as I want to use longer passwords and all characters like in AD passwords. This would be nice for security and it will not be a bed idea to implement some kind of DirSync. Of course the new version of Essentials server is also more integrated with Cloud as previous. There is a very nice function for Azure backup, creating VPN to Azure and some others. They are very useful for small companies as they are easy to configure and use.

Essentials2016-3
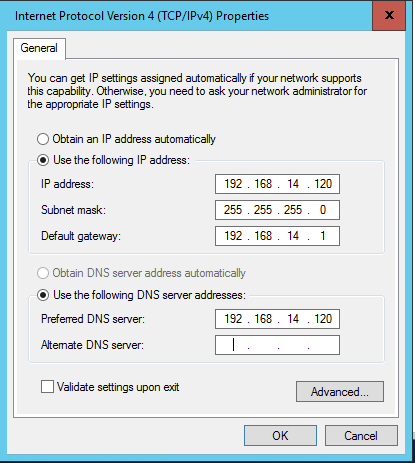
I am still convinced that a server should be the heart of the system, even when the system is a small one. I don’t want to have a router who has DNS and DHCP roles. For this reason, my advice will remain that you should transfer DNS and DHCP roles to the server and to have a control over them. Please configure a static IP on the server as in bigger AD systems – it is the same environment and it will work better.

Essentials2016-4
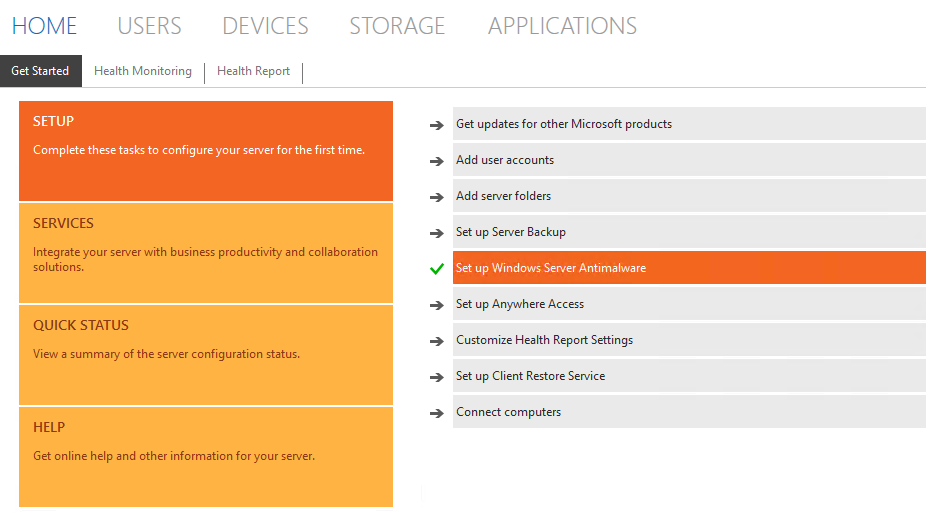
The additional new function that I very appreciate is the antimalware software. I saw many small environments without antivirus. They are convinced that there is no real danger for contamination as no one is working on it (well, they missed a lot of actions, but…). Now the antimalware is incorporated. It is not the best from the configuration perspective, but it is free of charge and it is just one click to turn it one. Please do it if you don’t plane to install any other antivirus; it is not a bad choice!
Essentials2016-5
There are many new things in Server 2016; Essentials and Standard version, so you can expect a lot of posts on blogs in this days. Of course if you have time and you plan to use it, it is time to begin to discover new functionalities and test the product..

Windows servers 2016 Technical Preview 3 is available on MSDN

For anyone who want to test the new release of Windows server, now it is possible to download the technical preview 3 on MSDN. This version has many new features and it has corrected many errors or missing functionalities. I would suggest to everyone to try it as is the last TP before RTM and if you want to be prepared at server launch, you have to learn new things now. If you want to know exactly what is new in TP3, you can read it at http://blogs.technet.com/b/server-cloud/archive/2015/08/19/what-s-new-in-windows-server-2016-and-system-center-2016-technical-preview-3.aspx and https://technet.microsoft.com/en-us/library/mt420609.aspx.

There are also Microsoft blogs which I want encourage you to read:
Windows containers: http://weblogs.asp.net/scottgu/announcing-windows-server-2016-containers-preview, http://blogs.technet.com/b/server-cloud/archive/2015/08/19/new-windows-server-preview-fuels-application-innovation-with-containers-software-defined-datacenter-updates.aspx and http://highscalability.com/blog/2015/8/19/the-microsoft-take-on-containers-and-docker.html. .

Blocking Chrome or Firefox with GPO

We have a lot of users where Google Chrome or Mozilla Firefox it is” installed automatically” – they did nothing (well, we know them…). In this cases, you want to block the installation of this two programs and maybe some others, but you don’t know how.
Actually it is very simple and you have two different ways to do it.
The first approach is good if you want to block the installation only on one or on some computers or there is no domain. In this case you have to modify the Local policy of computer. Open mmc.exe, from File menu choose Add / Remove Snap in… and select Group Policy Object. The new window will open and be careful that under Group Policy object is selected policy “Local Computer”. Steps in advance are the same as in the second approach, so they will be discussed later. Here you must have in mind that local administrators are able to change local policies.

LocalPolicy view
The second approach is similar. The only difference is, that we will use a GPO (Group Policy Object) and for this reason we can apply this settings to a large number of computers. It depend where do you link this GPO.
This steps are in common for both approaches. It is the same way to block any software if you are using local policy or group policy. (Be careful when you are blocking some programs as you can look out also yourself!!!)

  • Expand Computer configuration
  • Expand Windows settings
  • Expand Security Settings
  • Expand Software Restriction Policies
  • In the action pane click on More Actions and click New Software Restriction Policies…
  • Expand Additional Roles
Policy settings
  • In the Action pane click on More Actions and click New Path Rule…
  • For blocking Chrome, you have to create 5 rules with values (for any value you have to create one role):
    • Path:     Chrome.exe                                      Security level: Disallowed
    • Path:     ChromeSetup.exe                          Security level: Disallowed
    • Path:     Gears-Chrome-Opt.msi                Security level: Disallowed
    • Path:     Chrome_Installer.exe                   Security level: Disallowed
    • Path:     GoogleUpdate.exe                         Security level: Disallowed
  • For blocking Firefox, you have to create 2 rules with values:
    • Path:     Firefox.exe                                        Security level: Disallowed
    • Path:     Firefox Setup*.exe                         Security level: Disallowed
Setting of the role

Hope I helped someone with this post. Let me know..

Create redirected folders with PowerShell

As many of us know, to setup redirected folders you have to create root folder, permissions and sharing manually. You do it always in the same way: search internet for exact permissions that you need to set, control that is all OK, than share the folder…
Therefore, the job is ideal for a script as is always done in the same way; the only thing that is changing is the folder location and the domain name.
To simplify all this work I wrote a script to create a folder, setup the right permissions and share this folder. The only things you have to change in the script are:

  • the folder name and location
  • the name of shared folder
  • the group to which redirection will apply
  • the domain admins group (it is changing the domain)

You have to write these four variables in the beginning of the script and then just run it. All the work is done!

You can download script here..

Adding AD users via PowerShell script and CSV file

In one of my previous posts, I wrote how to add groups and their members in AD. Some of my friends validated this post as very usable, but they missed the first step: how to add users with all properties to AD. There are many scripts on the net, but I didn’t find a script with enough properties and I decided to write my own one.
I tried to think what the IT persons want and I arrived to those fields:

  • Users name
  • Users surname
  • Users Display name
  • Users SAM name
  • Company with complete address
  • Department where users are working
  • Manager
  • Office where who is situated
  • Home directory
  • Mobile phone
  • Company phone
  • OU where user is created (it is not the best idea to create them in default OU)

In addition I tried to do some more things like users password is always the same and users has always to change this password on first login (be careful with some users, who are working for example only true RDP). I found all this data useful also for future use like for creating a script for Mail signature and similar.
All that you need you will find in this ADUsers script. You will find a script and an Excel file where to add user’s data. You have to fill white cells; yellow cells are formula based and are calculated in base of white ones. The formula that you have to change, as you need, is how the username is created. At the end be careful that you will avoid duplicated data.
Have a good usage and good work!


ADUsers.zip download link.