Everyone is talking that the future is, that users have the same device at work and at home. I agree that this is becoming reality and we can see it every day in almost every company (for example smart phones connected to Wi-Fi networks or tablets etc.), but this is not always good for our companies and administrators. If you want to enable BYOD for their employees, please read this article before you start. I completely agree with the 16 rules and as a result of missing them, you can get some malware attacks, because the malware is using all possible ways to enter into your network. You will be also surprised how many zero day attacks are present today… it’s an interesting reading!.
Step-by-step install Windows Server Essentials 2012 R2 with non local domain
As the best practice of the latest few years, .local domain is not a good way to be deployed in any environment. The main reason for this is that since November 1 2015, will end the ability to have .local domains in public certificates. This will also apply in small environments, because we also use that certificates (for example we use them in Remote desktop services, Exchange, Remote web workplace…). On the other way, it is also not a good choice to have the internal domain name the same as the external. I would suggest you, for the internal domain name, to choose some kind of subdomain of the public domain name. For example, we can use company.com as public (external) domain name and internal.company.com as internal (Active Directory) domain name.
When you install the Essentials Server 2012R2, you will not be able to choose the internal domain name as you want, but this is simply your NetBIOS domain with.local extension in the end – exactly the type of extension we want to avoid.
Here is the step-by-step guide how to install Essentials server with different, more accurate options. In the example we have below, we will install Essentials server with NetBIOS domain name MyCompany, AD domain name Internal.Mycompany.com, server name MyServer and company name MyCompany. In your installation, you have to change the variables to your desired values.
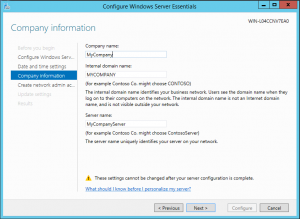
The installation begins with a normal server installation from a media and after the server restarts, when the Configure Windows Server Essentials wizard will appear, you can see that you have no place to write your AD domain name (picture 1).
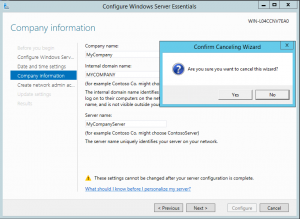
At this point, just close this wizard with cancel (picture 2).
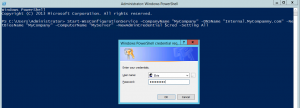
Open the PowerShell as Administrator and write the syntax:
Start-WssConfigurationService -CompanyName “MyCompany” -DNSName “Internal.MyCompamny.com” -NetBiosName “MyCompany” -ComputerName “MyServer” –NewAdminCredential $cred -Setting All
The explanation of all used switches is available on TechNet. Enter your AD administrator credentials in the window that will appear. This will be the new administrator – the same as you configure it in the Essential server wizard (picture 3).
When the system will prompt, if you want to continue the Essentials server configuration, just click Y (picture 4).

Exit from PowerShell and the server will restart. After this, when you log in, you will see that the wizard Configure Windows Server Essentials will run. You have just to wait that it will finish. At this point the wizard has all the information it needs and you are not able to change them (picture 5).
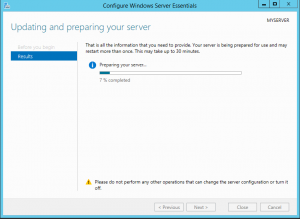
This is all you need to do. As you can see in the picture 6, now we have installed the server with a non .local domain and with all the settings we want.
Converting VM from Generation 1 to Generation 2
In Hyper-V on Windows Server 2012R2 you are able to create the next generation of VMs – Generation 2, which is without legacy components. Those machines works better, but you are unable to transform existing VM from Generation 1 to Generation 2.
However, Microsoft published a script, which transforms VM, form Generation 1 to Generation 2. It is not an “upgrade” for VM, it is a creation of a new Generation 2 VM from the existing Generation 1 VM.
Be careful before you proceed with transformation and read all the documentation!
The script can be downloaded here..
Redirecting default OU for users and computers
As you probably know, by default, newly created user or computer is placed in default OUs Computers or Users. It is not a good practice to leave them there, because we are not able to apply GPO to these OUs and in many cases, we need more OUs. The good example why to create more OUs is that we need different policy for notebooks, desktops and servers.
There is also a good practice to change default containers for users and computers to one of these newly created OUs.
It is very simple to redirect them. You have to execute two commands from Administrative command prompt:
- For users: redirusr ou=MyDefaultUserOU,dc=domain,dc=local
- For computers: redircmp ou=MyDefaultComputerOU,dc=domain,dc=local
If you want your environment to be even more secure, just put this default OUs in OUs that have the most restricted GPOs applied. In this way, you will limit the access to your environment..
Problems installing Windows Server 2012R2 on HP DL380e
I received a HP DL380e Gen8 in my office to install the Windows Server 2012R2 operating system. Unfortunately, the operation was not as easy as I expected. There is no way to correctly install OS without receiving blue screen. The problem is the driver for the RAID controller B320i. At the moment, when you inject that driver, you receive a blue screen.
Here are the steps how to solve the problem:
- Download SPP DVD from http://h18013.www1.hp.com/products/servers/service_packs/en/index.html .
- Update the firmware using SPP DVD:
- Boot the server from HP Service Pack (from DVD/using iLO Virtual media).
- At the Boot menu, select Interactive Mode (Automatic is default).
- Please wait while HP Service Pack loads on your Server.
- Select the Language from below provided screen.
- Accept HP End User License Agreement (EULA) and click Next.
- Click Launch HP SUM.
- HP Smart Update Manager will open and start building Inventory of Available Updates.
- HP SUM will Check Installed Firmware of your Server.
- Now you are at Select Bundle Filter window.
- You need to select HP Service Pack.
- Once you select HP Service Pack, click OK.
- Once you choose the firmware update, click on Install button.
- HP Smart Update Manager will install the selected Firmware updates on your Server.
- Once the Firmware is updated then try to install the OS 2012 R2:
- Download HP supplement pack available for Windows 2012 R2 at ftp://ftp.hp.com/pub/softlib2/software1/supportpack-generic/p1235385378/v89111
- Unpack the downloaded file to desired media.
- Locate the cp020926.exe and extract it to an USB drive. (this is a functional RAID driver)
- Install OS directly from OS media and for B120i/B320i controller use cp020926.exe.
This way the operating system installation will be successful.
Many thanks to HP global support for helping me solve this issue. They also promised me that in the next release of HP intelligent provisioning firmware 2012 R2 drivers will be included.
it form here..
