In some cases, you need to establish VPN before you login to Windows. As some VPN clients offer this method (not all of them, of course), I had a requirement to create this option with Windows build in client.
Here I found a trick; If you want to create VPN connection thru Windows settings, it will not appear on logon screen and this is not useful for me. If you create VPN thru network and sharing centre it is different – VPN connection appears on logon screen. Makes sense? No, but if you need it, is good to know how to configure it.
So, here you can follow the step by step instructions:
- Open Control Panel
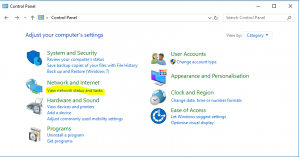
- In Control Panel click View Network status and Tasks
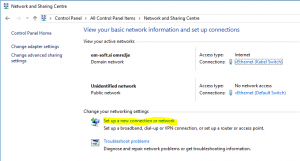
- In Network and Sharing Centre you will find a wizard to create a new VPN connection by clicking on Set up a new connection or network. It is almost the same as in other ways, but if you create VPN here, it will appear on the start screen. It is important, that you create VPN for all users!
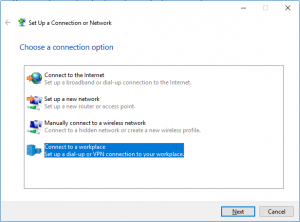
- On the Set up a Connection or Network wizard you have to choose Connect to workplace
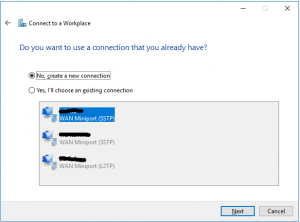
- On the next step you can use an existing VPN connection or create a new one. If you already have a VPN configured, you can just modify it. In my case I will create a new one (I prefer always to create a new connection). If I have an old configuration, I always delete it and recreate a connection from the scratch
- On How do you want to connect, choose Use my Internet connection (VPN)
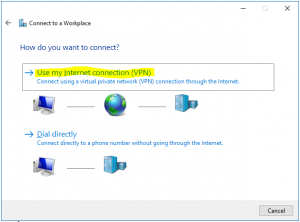
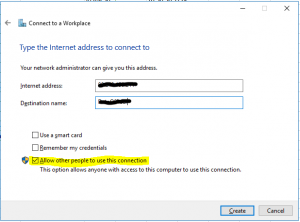
- Write the name or IP of the VPN endpoint, destination name and do not forget to check Allow other people to use this connection. Then click on Create
- If you want to do additional setting on this connection (specify protocol, add certificate …), you have to open the ncpa.cpl (Network Control panel) and from there you can review or change all settings you want
A connection done in this way will appear on logon screen and it is possible to establish VPN before you login in Windows.
