Not able to backup Generation 2 VM

I was very disappointed when I tried to backup my Generation 2 VM with the last version of DPM and I saw that DPM is not able to make a backup. Of course the next step was to backup the same machine (bare metal) from Windows backup, because a lot of times you can see more detailed error in this step. In this case it was exactly as I hoped. From the Windows backup I received an explanation of error – there is not a enough free space of volume \\?\Volume{7ab7a499-9013-4f22-90a7-f8fb2f70e349}\.
What is this volume? I checked it from Administrator command prompt and I saw that this is the 300MB boot partition and of course there is not enough space.
To solve the problem we will execute all commands from the elevated command prompt.

The first step you have to take is to find the volume label. To do this, we have to use the command mountvol. You have to look in the results and there you will find a non mapped volume:
    \\?\Volume{7ab7a499-9013-4f22-90a7-f8fb2f70e349}\
        *** NO MOUNT POINTS ***
At this point we have to move the location of shadow copies with this command:
vssadmin add shadowstorage /for=\\?\Volume{7ab7a499-9013-4f22-90a7-f8fb2f70e349}\ /on=c: /maxsize=500MB
This will move the location of shadow copies to drive C:. Of course, you can choice any other drive where you have enough free space. You can test if the location has really changed with vssadmin list shadowstorage.
After this change, the Windows backup was successful, but I still had problems to perform backup with DPM but it is simple to make it work. Just delete the current protection (Stop protection of the member…), remove the data from the storage and recreate the protection. It will work..
Windows Server 2012 and 2012R2 documentation

Microsoft did a good work with Windows Server 2012 and 2012R2 documentation. They put together all TechNet documentation to one PDF document, so now you can have concentrated all the server documentation in one single file. It is complete, easy to find (OK, there are approximately 8000 pages…) and all in one place. Very nice.

This file is downloadable from TechNet by clicking this link..

Step-by-step install Windows Server Essentials 2012 R2 with non local domain

As the best practice of the latest few years, .local domain is not a good way to be deployed in any environment. The main reason for this is that since November 1 2015, will end the ability to have .local domains in public certificates. This will also apply in small environments, because we also use that certificates (for example we use them in Remote desktop services, Exchange, Remote web workplace…). On the other way, it is also not a good choice to have the internal domain name the same as the external. I would suggest you, for the internal domain name, to choose some kind of subdomain of the public domain name. For example, we can use company.com as public (external) domain name and internal.company.com as internal (Active Directory) domain name.
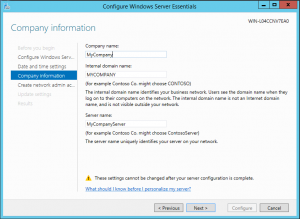
When you install the Essentials Server 2012R2, you will not be able to choose the internal domain name as you want, but this is simply your NetBIOS domain with.local extension in the end – exactly the type of extension we want to avoid.
Here is the step-by-step guide how to install Essentials server with different, more accurate options. In the example we have below, we will install Essentials server with NetBIOS domain name MyCompany, AD domain name Internal.Mycompany.com, server name MyServer and company name MyCompany. In your installation, you have to change the variables to your desired values.

The installation begins with a normal server installation from a media and after the server restarts, when the Configure Windows Server Essentials wizard will appear, you can see that you have no place to write your AD domain name (picture 1).

Picture 1
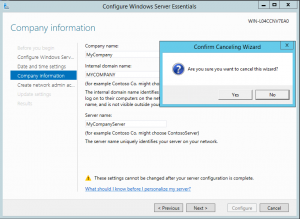
At this point, just close this wizard with cancel (picture 2).

Picture 2
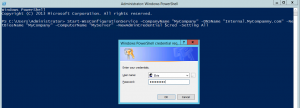
Open the PowerShell as Administrator and write the syntax:
Start-WssConfigurationService -CompanyName “MyCompany” -DNSName “Internal.MyCompamny.com” -NetBiosName “MyCompany” -ComputerName “MyServer” –NewAdminCredential $cred -Setting All
The explanation of all used switches is available on TechNet. Enter your AD administrator credentials in the window that will appear. This will be the new administrator – the same as you configure it in the Essential server wizard (picture 3).

Picture 3
When the system will prompt, if you want to continue the Essentials server configuration, just click Y (picture 4).

Picture 4
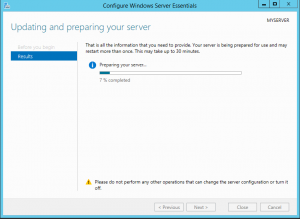
Exit from PowerShell and the server will restart. After this, when you log in, you will see that the wizard Configure Windows Server Essentials will run. You have just to wait that it will finish. At this point the wizard has all the information it needs and you are not able to change them (picture 5).

Picture 5
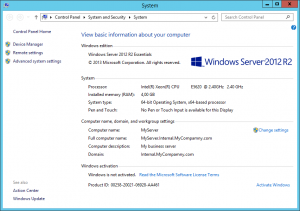
This is all you need to do. As you can see in the picture 6, now we have installed the server with a non .local domain and with all the settings we want.

Picture 6
.

Converting VM from Generation 1 to Generation 2

In Hyper-V on Windows Server 2012R2 you are able to create the next generation of VMs – Generation 2, which is without legacy components. Those machines works better, but you are unable to transform existing VM from Generation 1 to Generation 2.
However, Microsoft published a script, which transforms VM, form Generation 1 to Generation 2. It is not an “upgrade” for VM, it is a creation of a new Generation 2 VM from the existing Generation 1 VM.
Be careful before you proceed with transformation and read all the documentation!
The script can be downloaded here..

Redirecting default OU for users and computers

As you probably know, by default, newly created user or computer is placed in default OUs Computers or Users. It is not a good practice to leave them there, because we are not able to apply GPO to these OUs and in many cases, we need more OUs. The good example why to create more OUs is that we need different policy for notebooks, desktops and servers.
There is also a good practice to change default containers for users and computers to one of these newly created OUs.
It is very simple to redirect them. You have to execute two commands from Administrative command prompt:

  • For users: redirusr ou=MyDefaultUserOU,dc=domain,dc=local
  • For computers: redircmp ou=MyDefaultComputerOU,dc=domain,dc=local

If you want your environment to be even more secure, just put this default OUs in OUs that have the most restricted GPOs applied. In this way, you will limit the access to your environment..