Adding AD users via PowerShell script and CSV file

In one of my previous posts, I wrote how to add groups and their members in AD. Some of my friends validated this post as very usable, but they missed the first step: how to add users with all properties to AD. There are many scripts on the net, but I didn’t find a script with enough properties and I decided to write my own one.
I tried to think what the IT persons want and I arrived to those fields:

  • Users name
  • Users surname
  • Users Display name
  • Users SAM name
  • Company with complete address
  • Department where users are working
  • Manager
  • Office where who is situated
  • Home directory
  • Mobile phone
  • Company phone
  • OU where user is created (it is not the best idea to create them in default OU)

In addition I tried to do some more things like users password is always the same and users has always to change this password on first login (be careful with some users, who are working for example only true RDP). I found all this data useful also for future use like for creating a script for Mail signature and similar.
All that you need you will find in this ADUsers script. You will find a script and an Excel file where to add user’s data. You have to fill white cells; yellow cells are formula based and are calculated in base of white ones. The formula that you have to change, as you need, is how the username is created. At the end be careful that you will avoid duplicated data.
Have a good usage and good work!


ADUsers.zip download link.

Delete Canon print drivers with PowerShell

Some days ago I had a problem with Canon drivers (and to be honest, I am convinced that Canon has to do something to solve the situation). At this moment the only way to change Canon printer driver it is to reinstall it from the original package and this cannot be done silently (as I know, correct me if I am wrong). Uninstalling drivers via standard way is not possible as the “driver is in use” all the time, the spooler is active and if you stop the spooler, you cannot uninstall the driver because the spooler is not running. Crazy!
What was my idea? First, I have an environment with few thousand computers, so all the process must be silent, automated and if it is possible traceable. As I have printers mapped form print server, the printers have to remain mapped and the driver should be downloaded from the print server on the first use (of course you have to manually reinstall new driver on print server). The best way to do this kind of work is PowerShell.
OK, so for the first I had to create a log source for the script as I wanted to trace all the work of the script and I wrote few lines of code to define all settings needed to put my events in log.
After this, it is absolutely needed that Print spooler is running and driver is not in use. I found a solution stopping the print spooler, renaming the winprint key in registry (this key is responsible for print process used by Canon drivers) and starting the spooler. In this way I created the situation where the print spooler is running, but not the winprint process– so the Canon drivers are not in use and they can be uninstalled.
The rest of the script find all Canon drivers (from registry), remove them with rundll23 PrintUI.dll command, rename winprint registry key back and restart the print spooler once again.
The final part is to write success or failure to Application log.

When you run script be careful to two things:

  • The script has to run as local administrator account or system account. If you run the script as user with less privileges, it will fail.
  • This script is valid for a 64 bit systems. If you have a 32 bit systems, you have to correct lines where registry keys are specified.

The script can be downloaded here: RemovePrnDrv Script.

Good work!.

Deleting print jobs in Error on print server

I had a problem in an environment where all users print thru one print server. The printer was worst one and we always had problems to delete some jobs in error. The users were also unable to print when the printer had a job in error. So, we wanted to automate that procedure to keep printers alive as much as possible.
In this case, we found two different but similar solutions, both in PowerShell.
The first is to delete jobs in non-working hours (true the night). We used the script:

get-printer | where {$_.PrinterStatus -ne “Normal”} | get-printjob |Remove-PrintJob

This script deletes all jobs on all printers where the status of the printer is not normal. This are pros and contras:

  • It runs thru the night, so the printer could be offline for whole day,
  • All jobs on the printer are lost. We preferred to do it in this way, as we didn’t know what kind of jobs were in the queue. It could a confidential information and is better to lose the job as leave those papers in the printer,
  • It has minimum impact to the print server.

The second option is running a similar script every few minutes:

get-printer | Get-PrintJob | where {$_.JobStatus -match “Error”} | Remove-PrintJob

This script has those pros and contras:

  • It could be run every few minutes and printers are really many time online,
  • It has more impact on the print server as the previous, but the impact is still minimum. There is not real difference in server usage.

After consulting with the customer, the best choice was the second version, running every 5 minutes. Now we have printers really with better uptime and the server is running practically on the same performance. Be careful that you run this script with an account who has permissions to delete print jobs (Print Administrator) and it will work. Anyway, if it is possible is always better to find the cause of errors and repair it. It is not always possible, but try to do it, before you use the script.
Still I am convinced that the best way to solve this type of issues is assign the second option directly to an error. When the printer is going to error, it is acknowledged as Error 372; Source: PrintService. You have just to assign a task to this error..

How to change network profile with PowerShell

Many times, my customers tell me that their network don’t not work well. They have problems with access to shares, they are not able to connect via RDP to some servers and so on.
The cause of this problem is in 90% of cases a wrong network profile. This can happen if you change router, network cards or other network equipment. A small distraction when you select the network type can have big consequences by blocking many services. All of these problems have the origin in default Windows settings, as the default network profile is Public. This setting is correct because it is the optimal solution when you connect to some untrusted networks (hotels, airports…) and if we think that we travel a lot, this situation is more frequent that connecting to a new home network.
There are also many posts how to change network profile on the net. Some are better than others are, but I want to solve this problem using PowerShell. In this way it works on clients and servers, it can be done always in the same mode and you can change a profile whenever you want. It is just one command:

Get-NetConnectionProfile | Set-NetConnectionProfile –NetworkCategory Private

Network categories you can use are Private or Public. You cannot set profile to Domain.

More on Set-NetConnectionProfile can be found here..

Publish Print server 2012R2 with CNAME record

As you probably know, there is no real high availability scenario for the print server in Windows Server 2012R2 environment. Many times we need that in case of a single server failure, users can do their job also when situations like this happens.
In these cases, it is possible to reduce the down time of a server deploying the second print server and use DNS CNAME to publish print servers. Anyway, there are negative parts in this solution:

  • DNS needs to be refreshed, so users can point to another server (consider to have short TTL on DNS record)
  • there is no supported way to publish that printers in AD. Publishing printers in AD is done thru computer name (A record) and printer shared name. As we need to publish printer thru CNAME record, this is not possible. There is a workaround with ADSIEDIT and changing published name, but this is not suggested. (I will cover this in a separate post)

Whatever, you can deploy printers with GPO preferences and this is not a so difficult process. You have just to be careful that every user has mapped the right printer (this can be done with GPO preferences filtering).
To create the discussed situation, first you must to have two print servers (in our case we will name them PS1.domain.com and PS2.domain.com). On the first server, you have to install and configure all printers that you need and you can share them, but not publish them in AD. Of course it will work also publishing them in AD, but if a user will choose a printer from AD, the failover will not work for him.
After doing this, you have to create a name and a CNAME record for our print server (I will name it PrintSvr) that point on the first print server. In our example:

CNAME PrintSvr PS1.domain.com TTL = 5 min

Keep TTL time small, because this time is critical when failover occours! Changing TTL it is not necesary if you plan to use Round robin.

With this, we can resolve our PS1 server with the name PrintSvr and you will be able to browse printers with CNAME, but if you try to install them, you will receive an error 0x00000709.

This is because we need some additional registry changes on the print server:

HKEY_LOCAL_MACHINE\SYSTEM\CurrentControlSet\Services\LanmanServer\Parameters
DisableStrictNameChecking QWORD 1
HKEY_LOCAL_MACHINE\SYSTEM\CurrentControlSet\Services\LanmanServer\Parameters
OptionalNames MultiString CNAME
HKEY_LOCAL_MACHINE\SYSTEM\CurrentControlSet\Control\Lsa\MSV1_0
BackConnectionHostNames MultiString CNAME
HKEY_LOCAL_MACHINE\SYSTEM\CurrentControlSet\Control\Print
DnsOnWire QWORD 1

The first and the last registry have to be DWORD type if you have Server older than 2012R2
This are all the changes that you need to do. As we changed the registry, do not forget to reboot the server. When everything is completed, you can export the print server configuration from Print Management console to file. This we be useful on the second server.
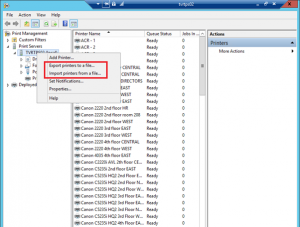
Print
On the second server, you have just to install the print server role and add the same registry values. After doing this, you can import all printers in the same way as you exported them on the first server. This will import all your printers with exactly the same names and with the same share names. So, there will not be any problem when you will switch the server. Restart the server.
Now you are ready to test the environment. Change the DNS CNAME record in the way that will point to the second server and test if printers still work (of course you can wait that TTL expire or you can flush cache of DNS servers and client where you are testing).
Good work!.