Cryptolocker…

Everyone of us want to stop Cryptolocker and similar programs. It seems that it is really a nightmare for all admins. Anyway, to stop Cryptolocker and any unwanted program, you have to be aware, that this will bring limitations to your system, which are not always welcome.

How does Cryptolocker work?
We have 5 phases of Cryptolocker infections:

  1. Installation: The software is delivered to your computer via download or E-Mail attachment and the user click on it. The executable is now installed, the registry keys are set and we are ready to go to the next phase.
  2. Contacting headquarters: the computer is contacting criminal headquarters for registration, so it will prepare all environment for phase 3.
  3. Creating keys: headquarter and client are now identifying each other and are ready to “handshake” and create two keys for encryption.
  4. Encryption: Cryptographic keys are now established and the encryption can begin. It depends on version, but almost all files on all local and shared drives where you have permissions will be encrypted.
  5. Extortion: The screen with a guide how much and where to pay is displayed. There is displayed also how much time you have for payment. If you will not pay in time, the headquarter key will be deleted and you will not be able to decrypt files. The payment is every day higher – so if you want to pay, do it immediately.

To prevent a large number of unwanted software, the first step to do is always remove LocalAdmin permissions and turn on UAC. This two actions will put you in situation where user will not be able to install any application and write to system crucial folders. Also have your system always up to date. And I don’t mean only OS, but include all applications installed (we know attacks to Java, Adobe FlashPlayer, Microsoft Office…).
Of course this is not enough as a lot of bed guys know how to elevate permissions or are using different folders (for example AppData is used for Cryptolocker), but been a LocalAdmin is a great way to become a victim. I suggest to all home users and system administrators to use two different accounts – one for daily use and the second for administrator tasks.
Well, the real way to prevent Cryptolocker is blocking the execution of exe files in AppData folder. You can do this with group policy in AppLocker or in software restriction policy. This are steps for basic protection with AppLocker:

  1. Create new GPO for Cryptolocker prevention
  2. Edit new created GPO
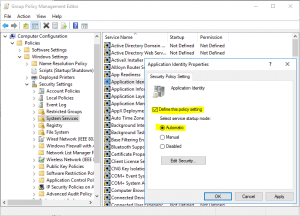
  3. Expand Computer configuration > Policies > Windows Settings > Security settings > System Services
  4. Enable “Application Identity” service and set it to automatic startup modeCrypto1
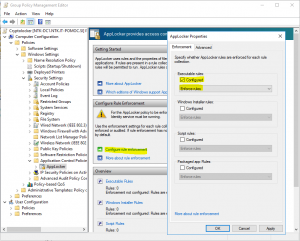
  5. Go down to Application Control Policies and expand to AppLocker
  6. In “Configure role enforcement enable Executable rules and make them in Enforce mode (I suggest you, to run them in Audit mode for week or two and analyze logs before enforcing them – just to find legal applications which can be blocked)Crypto2
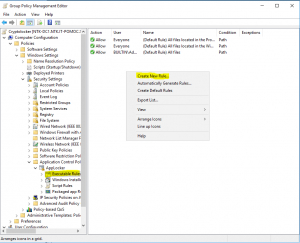
  7. Expand AppLocker and click to Executable rules
  8. Right click in action pane and create Default Rules
  9. Right click in action pane and create New RuleCrypto3
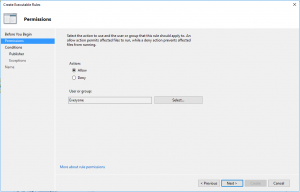
  10. In Permissions on Action set Allow for EveryoneCrypto4
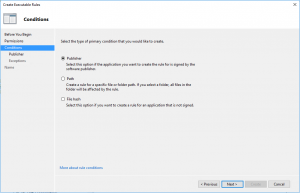
  11. In Conditions select that is Publisher ruleCrypto5
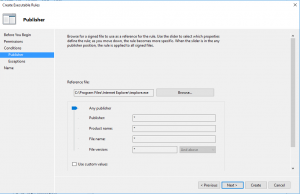
  12. In Publisher, just browse one file (in my case was Internet Explorer) and go with slider up to Any publisherCrypto6
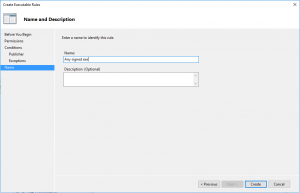
  13. Give the name to the ruleCrypto7

So, this is about AppLocker, but we have still a lot of work to do. There is a big surface for attack if users are local admin. To prevent this, configure Restricted groups in GPO by using Computer Configuration > Policies > Windows Settings > Security settings > Restricted Groups.
Apply this GPO to all computers and the first step is done.
GPO is a good way to prevent Crypto, but be aware that Crypto is evolving and you have to evolve with him. And preventing Crypto with GPO means that executable is already in your system – maybe you have to prevent it before is downloaded or received with mail. For this step you will need the application firewall, good antivirus in file system and in mailing system.
But still you can do something with chip devices with closing outgoing ports 83, 846, 777, 997, 1604, 9001, 9003, 444, 9052, 8443, 7777, 9003 and 25254. This ports are used to communicate with headquarter servers to obtain a certificate for encryption (maybe exist also other ports or will be added / changed during the time). If you will close this ports, the system will not be able to retrieve a certificate for encryption and the encryption will not be able to begin. Be careful on notebooks because the users will bring their notebooks at home and the encryption will be successful.
As you can see, there are a lot of ways to prevent Cryptolocker, but you have to prevent it. When you have it, it is too late – think about it now!

And for home users? Well we cannot forget them. They have a lot of pictures and documents on their computers – practically a whole life and is a really big impact to lose all this material.
I suggest you a software from FoolishIT. It is free and it is working good (but if you want to keep it up to date, give those few Euros to the author – he is doing his job well!).


Additional reading:
https://blogs.technet.microsoft.com/mmpc/2015/01/13/crowti-update-cryptowall-3-0/
http://www.crowdstrike.com/blog/4-0-another-brick-in-the-cryptowall/
http://researchcenter.paloaltonetworks.com/2015/02/analysis-cryptowall-3-0-dyre-i2p/
https://tools.cisco.com/security/center/viewAlert.x?alertId=36338

Hyper-V replica broker don’t start

In some cases, when you try to install Hyper-V replica broker in FailOver cluster, the installation finishes successfully, but the service itself don’t start. The reason is the insufficient permissions on AD object. Of course you (and me) are not the first one who has this problem and the solution is documented in this TechNet blog post. If it is possible, I prefer to create container for Hyper-V clusters and hosts and delegate permissions on this OU – option 2 (it is better for future changes), but is up to you what do you prefer..

Installing Nano server on Phisical computer

Many of us are testing Nano servers, but as creating VHD is well documented and you can find step-by-step instruction anywhere, deploying Nano server on a host computer is not well documented. I will try to make a step-by-step deployment for deploying a Nano server on a physical server and disk in this post.
All files that you need for deploying a Nano server are located in NanoServer folder on the installation DVD.
For begin deployment you have few possibilities; you can start from Win PE environment, WDS or installation DVD. If you start from DVD or WDS, you have to launch a setup program and then in the first step (where you can choose the language) press Shift + F10 to open command prompt. Actually we do not need installation, but we use it only to access to the command prompt.
Now, we will use diskpart.exe for preparing and partitioning the disk. Here you have to know some limitations: Nano server will start if disk is in formatted GPT mode and here we will prepare the disk to start from UEFI. So, let start and prepare our disk:

Diskpart With this command you will enter in the diskpart mode
List disk Use to locate the disk where you want to install the Nano server. (in my case is number 2)
Select disk 2 Select the right disk
Detail disk Optional – with this command you will receive detailed info about the selected disk
Clean If there are some partition on disk, you have to delete them
Convert GPT This command will convert your disk to GPT

The next step is creating partitions that we need. As we want to use UEFI boot, we need three partitions.

Create Partition MSR Size=128 Create MSR (Microsoft reserved) partition
Create Partition EFI Size=128 Create System partition
Format FS=FAT32 Quick Label=EFI Format System partition
Assign Letter=S Assign letter to System partition
Create Partition Primary Create primary partition
Format FS=NTFS Ouick Label=System Format primary partition
Assign letter=W Assign drive letter to primary partition
Exit Exit from diskpart

With these steps we prepared the disk for deploying server. Now we have all partitions ready, but we still need to deploy the server image and create this disk as bootable.
For deploying the image, we will use DISM. Deploying image with DISM is exactly the same as in previous versions, but you have to remember that when you will log in to Nano server, you will not be able to add or remove functionalities or manage server directly from server – this must be done remotely. For this reason, it is better to deploy packages we need in this step. Of course OEM drivers package is mandatory as we are deploying server to physical server.

For deploing server image on the disk you have to use DISM in this way:

dism /Apply-image /Imagefile:C:\nanoserver\nanoserver.wim /Index:1 /Applydir:W:\

You may have to change the file destination and apply directory based on your configuration.
Now the server image is deployed on the disk, but it is only a basic image and we still have to deploy drivers and functionalities that we need. All of this can be done by deploying packages and drivers. In some cases, you will need to deploy additional drivers (for example RAID drivers). This deployment is also done with DISM, but is not covered in this article.
Packages that are available for Nano server are located in Packages folder on DVD and you can choose which to install. DISM command for installing the package is:

dism /Add-Package /PackagePath:C:\NanoServer\packages\Microsoft-NanoServer-DSC-Package.cab /Image:w:\

Once again you have to change the package location and name and where to deploy it (image parameter), based on your configuration. In this way you have to deploy all packages you need; one by one. This are packages that are available for Nano server:

Compute = Hyper-V Server
OEM-Drivers = Standard OEM Drivers (required if server is host)
Storage = Storage Server
FailoverCluster = FailOver Cluster Server
ReverseForwarders = ReverseForwarders to allow some older App Servers to run
Guest = Hyper-V Guest Tools (reqired if server is virtualized)
Containers = Support for Hyper-V and Windows containers
Defender = Windows Defender
DCB = Data Center Bridging
DNS = DNS Server
DSC = PowerShell Desired State Configuration Support
IIS = Internet Information Server (Web Server)
NPDS = Network Performance Diagnostics Service
SCVMM = System Center VMM
SCVMM-Compute = Sysmte Center VMM Compute

Now remains only to make the disk bootable and we will use BCDBOOT:

bcdboot w:\windows /s s: /f UEFI

Don’t forget that some switches may have to be different and they depend on your configuration. W:\Windows is the folder where you have the deployed server image and S: is the letter of EFI partition.

Finally, we have all done, just reboot the server and use it.
As in all other server installations, on first logon you have to change the Administrator password. Don’t be afraid how, just try to logon with blank password and you will be asked for a new one..

How to compact VHD or VHDX

When we try to compact dynamically expanding VHD or VHDX we have to do few things if we want reach good results.
First we need to know how file system is working. It is important to know that when we delete a file or just a part of the file, those data are not really deleted, you just remove a pointer to that sector. This is important because the compact operation will just remove the free space and simply deleting the file will not free the space on VHD file.
For this reasons you have to prepare VHD before you can compact it. To prepare virtual disk for this operation, three steps are important:

  • Empty Recycle bin – if you have files in Recycle bin it is best practice to delete them before compacting disk as they need space like any other file.
  • Defrag VHD – it is recommended also to defrag the disk for getting best results. This will also speed up your work with VHD.
  • Write zeros to free space – writing zeros on free space you will remove all “deleted” data, so this is a really important step that will free your space.

To write down zeros you need external application as there is no build in application to do it. I am using Rusinovich’s SDELETE (https://support.microsoft.com/en-us/kb/2786067). The usage is very simple; you have just to run sdelete from administrative command prompt with Z switch. For example, if you want to free space on D drive you have to run a command in this way:

Sdelete.exe -z d:

With this command you will free space and now you are ready to compact VHD form Hyper-V manager or PowerShell. Using this steps, you will really decrease a space used by VHD. .

Calculating RAID IOPs

Many times my colleagues ask me how to determinate IOPs on their RAID or storage. There are a lot of posts on internet and for this reason I don’t want to create another copy of the same content.
Of course you have to calculate IOPs based on disks that you have. Not all the disks are the same and real IOPs can vary, based on the model of the disk. How to calculate IOPs of the disk is well explained in this link http://www.techrepublic.com/blog/the-enterprise-cloud/calculate-iops-in-a-storage-array/. But if you want just an approximate calculation of your RAID field, you will like this link http://www.thecloudcalculator.com/calculators/disk-raid-and-iops.html. It is approximatively as IOPs depend on actual mark and model of disks, RAID controller or NAS, but it can be used as a guideline to determinate your configuration..