Publishing terminal services through the web is more and more popular and I am still convinced that we have to use them more. Maybe with publishing this article I will help someone to decide and publish them. In this article, it is nothing new or revolutionary; there are practically few tricks, that my customers like.
There are many changes, in working with remote applications, that are coming with Windows Server 2012. After some of us really appreciated publishing remote applications with a method of distributing RDP files or MSI installers in Windows Server 2008 and 2008R2, now it is not possible to do it anymore. Many changes are visible also in the installation of RDP rules. Now we have separate steps form installing “just rules and features” – this is a good thing, because doing installation this way, there are not so many errors in RDP deployment and it is the only right way for installing web access and other RDP rules (don’t do it through rules and features!!!).
In addition, this WEB access is the functionality where I want to show some tricks.
As we know, the address https://rdp_server.publicname.com/rdweb is the address, where we can access to our applications. Here you can see a desired application instantly after it was installed and published.
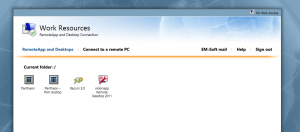
Many times we have unhappy users, because for running those application they have »a lot of work« – they have to type this web address and login… Other not nice functionality of this web interface is that some browsers are unable to run RDP file directly from the web and they have to download it and run it.
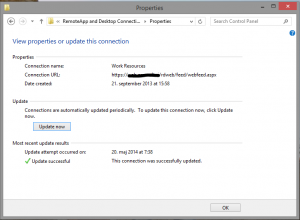
Here we can do something for our users. In Windows 7 and newer, in the control panel it is present a setting called Remote App and Desktop Connections. This is exactly what we want to do. Just type in the apposite text box the published web address and add in the end feed/webfeed.aspx (example: https://rdp_server.publicname.com/rdweb/feed/webfeed.aspx). This setting will put all published applications to which user has access to his Start menu under Work Resources (RADC). Need more? They are also dynamic; if you revoke permissions or deinstall application, the application will disappear from there. In addition, if you add a new one, it will simply appear there. Nice.
It is still too complex for your users? OK. Then we can try making this easier for them. There is an option to write the E-Mail address. In this case, E-Mail is used only for getting the domain name. All other work is done by DNS setting and all other process is equal as you write down a published address. Of course, the domain used in the E-Mail address must have a TXT record with this few parameters:
- Type: TXT
- Record Name: _msradc
- Text: https://rdp_server.publicname.com/rdweb/feed/webfeed.aspx
The text is the same as you have to write it manually and the domain can be published in a different way, as is the domain in the E-Mail address. Therefore, you have really many opportunities and a user needs to know only E-Mail address, username and password. Things that, I hope, he knows.
There is also another great thing: if you publish applications this way, you can publish them from different servers and domains at the same time and you can have contemporary access to services from different hosted services / clouds. It’s great!
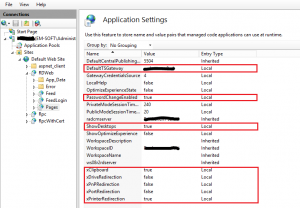
There is also another simple change that you can do in Internet Information Service (IIS) console. Just open the console and go to the location Sites > Default Web Site > RDWeb >Pages. At this point, open Application settings. As you can see on the picture, here are many settings that can help you with configuration:
- DefaultTSGateway – It is used to fix which RD Gateway will be used.
- Password Change enabled – It enables the option to change the password in RD Web console. It is very useful when a user has only RD access to our environment. But you have to be careful here, because if the user with a domain joined PC changes his password from outside, maybe he will lose some other offered services on his PC.
- ShowDesktops – It is a setting, that determinate if it is a section »Connect to a remote PC« visible or not. Some companies want their employees to connect remotely to their PC’s, other don’t allow this option. Don’t forget, that RD connections true RD Gateway will still work, even if this setting is disabled!
- Enabling or disabling redirections – This is actually an alternative place, where you can enable or disable redirections for printers, ports, drives, PnP devices and clipboard for all RD users. The same thing you are able to do through policies.
